Creating a Bitcoin Paper Wallet
Bitcoins are booming at the moment. Yes, it had a bit of dive, but its adoption and growth is incredibly exciting. I got into Bitcoin early 2011 when I decided to ‘play’ around by buying some. Needless to say, those few coins are worth quite a bit today.
Thefts of coins are becoming common, not only with end-users, but on hosted services too (online wallets). Storing your Bitcoins safely has become somewhat of a problem. One, which if not handled properly, can easily hamper the growth and trust in Bitcoin. If my grandma can’t store her coins safely how can it reach mainstream adoption?
This post, however, does not focus on the grandma demographic just yet. I’ve got some ideas on how to make it easier, but for now here’s how I created a Bitcoin paper wallet to store my Bitcoins.
Before I continue, there will always be some degree of paranoia involved in this: to what length will you go to store your money? This post is to satisfy my own level of paranoia.
Roadmap (tl;dr version)
So here’s what I do:
1) Create a Tails OS boot disk 2) Prepare BitAddress.org files 3) Boot into Tails OS 4) Create private keys using custom BitAddress.org fork 5) Print/store those keys 6) ??? 7) Profit
So that’s the short version.
Long Version (time to get paranoid)
I’m going to assume that you know some of the basics of Bitcoin and how it works. However, just to reiterate, each Bitcoin address (which is generated from the public key) has a corresponding private key which ‘unlocks’ the address. If you have access to an address’ private key, you can get access to the coins inside.
The standard Bitcoin client stores your private keys in a file called the wallet.dat. Its right there on your computer. If the file is not encrypted, any virus/person can just scoop the file and take your coins. However, if it’s encrypted, then you have to enter a password every time your make a transaction or want to access the wallet. However, this is still vulnerable to keylogging.
So the idea behind a paper wallet is that the Internet never ‘sees’ your private keys. There is no way that any person could get access to those keys. It was created offline and printed/stored offline so no-one can get it.
So here lies two problems:
1) How I do go completely offline? 2) How can I create a Bitcoin address + private key without being online? (Bitcoin is online digital currency nonetheless!)
The solution to number one is easy. Boot into a fresh OS install of your choice, usually something as easy such as Ubuntu which can written to a USB of CD/DVD. This way when you boot, you know there’s no malware and the computer has never been online.
The solution to number two lies in Bitaddress.org. This website is a client-side Javascript implementation of Bitcoin address generation. The code for the site is all available on Github. However, looking at BitcoinAddress.org it added one more problem that I was not comfortable with:
3) Private keys are displayed in plain-text.
Yes, the Internet will never see those private keys, but what if my printed paper wallet gets lost or someone steals the actual paper? You can decide if this is something you’d be paranoid about, but I did not feel comfortable having the private key out in the open like that. So my solution was to encrypt the private keys and display that instead. I’ll explain how to do it easily.
So now that we have the three problems solved. Let’s do this!
Step 1: Create Tails OS boot disk
So, there are a few options to create a safe bootable OS. As I mentioned earlier Ubuntu is one, but I found this Debain-based OS which is perfect for my paranoia. Tails OS. It is an amnesiac incognito live system. Like huh? What does that mean? It ‘forgets’ everything once you shut down and it forces its online connections via the TOR network. I don’t need to go online, but I feel safe with the fact, that if I need to, it’ll be even more anonymous and secure.
Download the .iso and burn it to a DVD. Check the Ubuntu instructions (just replace it with the Tails OS)
Step 2: Prepare BitAddress.org files
So, as I mentioned a little bit earlier. BitAddress.org generates public addresses and private key pairs in the browser. You can just save the site (save as…) and then put that onto a flash drive, however I created my own fork that added encryption of the private keys (among a few more tweaks).
It’s called Icecap (cold storage get it?). You can visit the repo here. Download the .html file and the aes.js file. Save that your flash drive. You’ll use this create your keys once you’re in the OS. You can read the repo readme for more information on my fork. In the future, you’ll only have to download one file.
You can decide which one you’d want to use. This tutorial will assume you used my custom version.
Step 3: Boot into Tails OS
This is a pretty self-explanatory step. If you’re on a Macbook, like me, just press alt on startup, wait for a few moments then select the DVD. The process on signing up is easy. You have to fill in a master password and there you go. Fresh OS.
Step 4: Create private keys using BitAddress.org
Once you have booted. Put your flash drive in and open the .html file you saved. You don’t have to go online! That’s the point of BitAddress and my custom fork: you can safely generate your keys without any online interaction.
For my own fork, go to the bulk wallet tab (the single wallet is still there if you want it). I’ll explain why I use bulk wallet generation later.
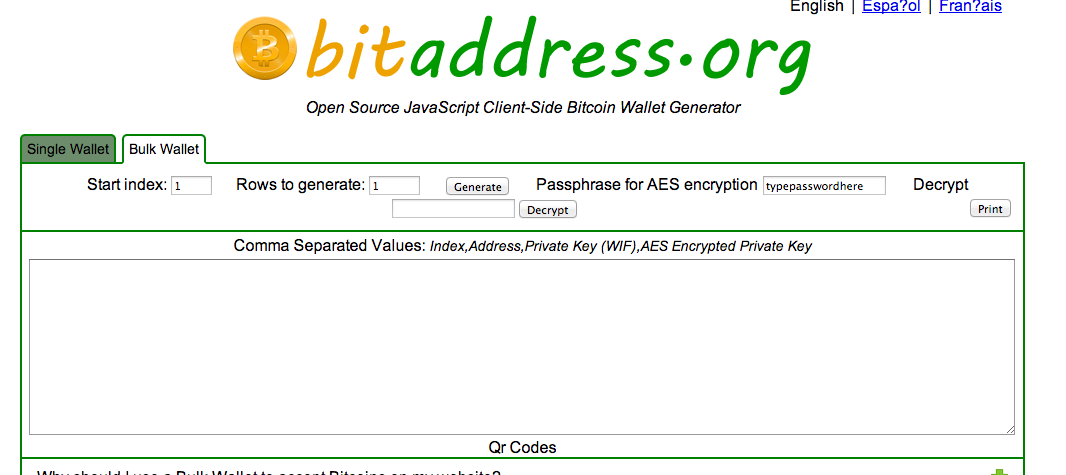
The rows to generate are how many key pairs ("wallets") you'll be creating. Before you press generate enter your passphrase for the AES encryption. Once that's all done, click Generate.
It'll display your public address, private key (wallet import format) and the AES encrypted private key. Below that, it'll show you the QR codes (this is still very simplistic crude design: the small one is the public adress and the big one below it is the corresponding encrypted private key).
If you want to get your private key from the encrypted key, enter the encrypted key into the decrypt box. Make sure you have the correct passphrase and press decrypt. If everything is good, the private key is then shown. This is for accessing your private key when you want to retrieve coins in the future.
NB: The encrypted private keys in the QR code have added inverted commas (quoted that is). Remove these if you scan them from the QR-code to decrypt in the future.
Step 5: Print/store those keys
Now remove the private keys from the text area and then print the whole webpage with the QR-codes (public adress + encrypted private keys). I saved the webpage as a .pdf file as well to keep a digital backup on a flash drive. Tails OS had some problems picking up my printer, but I just booted into my Mac (switched off the internet) and then printed it. I would not have felt safe doing this if I knew that the private keys weren't encrypted.
Sending and Retrieving Coins
Now that you have a public address you can pay coins to that address. I use Blockchain.info to look at my addresses. A random address I picked for example. To retrieve those coins I just use Blockchain.info’s online wallet to import the private key. This gives me access to the funds where I transfer them away.
Important Notes
Test that your encrypted private key can indeed be decrypted by your passphrase! This is very important. If this doesn’t work, then you’ll have a really hard time getting the private key again.
When you retrieve the coins from the address, you MUST transfer ALL the coins out of the address. The address is ‘compromised’, but there is another reason, whenever you retrieve the coins and a subsequent transaction uses the coins from that address, that address will no longer be valid. This is a rookie mistake. Read up on how change works in the Bitcoin network. You’ll be mistaken if you have 100 coins and spend 5 of them and still think that 95 Bitcoins are still in that address. However, the ‘change’ address is automatically stored in your wallet. So you won’t lose those coins, but just keep in mind that the original paper wallet address will not have any coins left in it anymore!
This brings me to why I used the bulk generation. I want to separate my coins into more than one offline wallet. I do this, because in the event that I want to retrieve my funds, I don’t have to recreate another wallet for ALL my funds. If you have only ONE offline wallet and only want to retrieve a few coins you have to make another wallet in any case. Thus, I see paper wallets as ONCE off retrieval. Once it’s retrieved, get everything out of that address and use it or move it around.
Conclusion
I’m sure there are ways to make this even more secure, but at the moment this satisfies my paranoia. I’ll be updating Icecap (repo is here) to make it bit more accessible in the future. I predict Bitcoins will continue to grow, thus storing your Bitcoins safely will be very important. Start now!
If you liked this tutorial consider donating some Bitcoins: 1QBRE1itGAta7HxnEBnQqF11YbtNDbx1c6
If you have any questions, comment below or email me: niel@delarouviere.com